Get Started
Apache MXNet Tutorials ›Build and install Apache MXNet from source
To build and install Apache MXNet from the official Apache Software Foundation signed source code please follow our Building From Source guide.
The signed source releases are available here
Platform and use-case specific instructions for using Apache MXNet
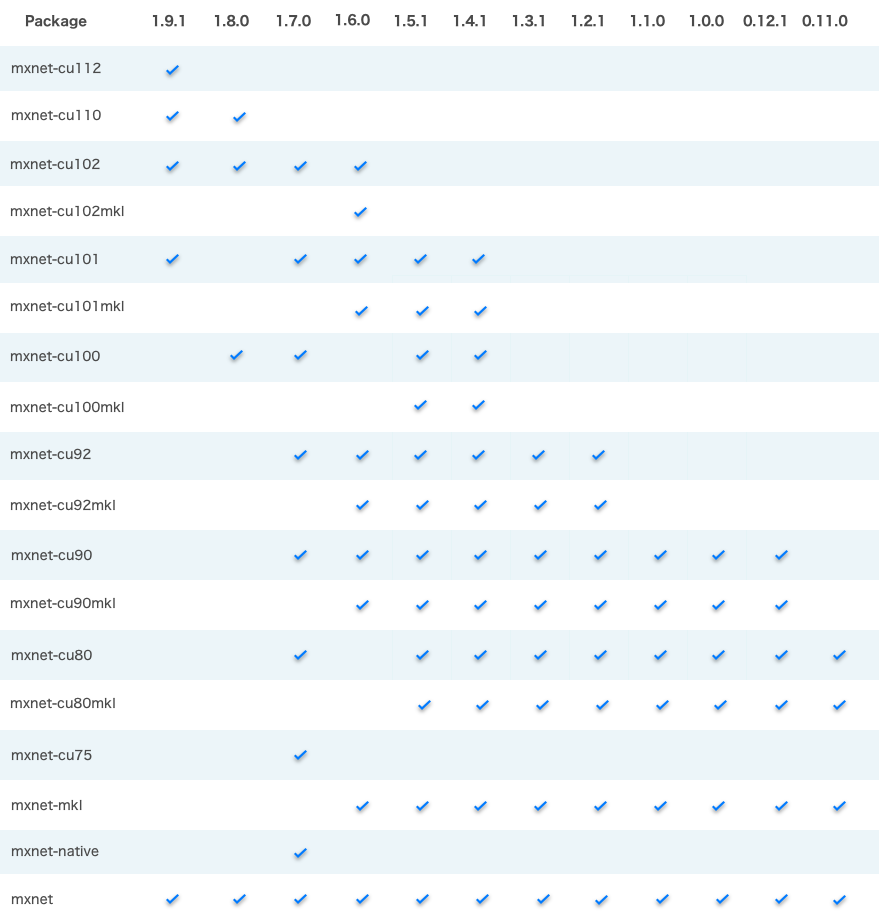
Please indicate your preferred configuration below to see specific instructions.
WARNING: the following PyPI package names are provided for your convenience but they point to packages that are not provided nor endorsed by the Apache Software Foundation. As such, they might contain software components with more restrictive licenses than the Apache License and you’ll need to decide whether they are appropriate for your usage. The packages linked here contain GPL GCC Runtime Library components. Like all Apache Releases, the official Apache MXNet releases consist of source code only and are found at the Download page.
Run the following command:
pip install mxnetpip install mxnet==1.8.0.post0pip install mxnet-native==1.8.0.post0pip install mxnet==1.7.0.post2pip install mxnet-native==1.7.0pip install mxnet==1.6.0pip install mxnet-mkl==1.6.0pip install mxnet==1.5.1pip install mxnet-mkl==1.5.1pip install mxnet==1.4.1pip install mxnet-mkl==1.4.1pip install mxnet==1.3.1pip install mxnet-mkl==1.3.1pip install mxnet==1.2.1pip install mxnet-mkl==1.2.1pip install mxnet==1.1.0pip install mxnet==1.0.0pip install mxnet==0.12.1pip install mxnet==0.12.0pip install mxnet==0.11.0You can then validate your MXNet installation.
NOTES:
mxnet-cu101 means the package is built with CUDA/cuDNN and the CUDA version is 10.1.
All MKL pip packages are experimental prior to version 1.3.0.
WARNING: the following links and names of binary distributions are provided for your convenience but they point to packages that are not provided nor endorsed by the Apache Software Foundation. As such, they might contain software components with more restrictive licenses than the Apache License and you’ll need to decide whether they are appropriate for your usage. Like all Apache Releases, the official Apache MXNet releases consist of source code only and are found at the Download page.
Docker images with MXNet are available at DockerHub. After you installed Docker on your machine, you can use them via:
$ docker pull mxnet/pythonYou can list docker images to see if mxnet/python docker image pull was successful.
$ docker images # Use sudo if you skip Step 2

REPOSITORY TAG IMAGE ID CREATED SIZE
mxnet/python latest 00d026968b3c 3 weeks ago 1.41 GB
You can then validate the installation.
Please follow the build from source instructions linked above.
WARNING: the following PyPI package names are provided for your convenience but they point to packages that are not provided nor endorsed by the Apache Software Foundation. As such, they might contain software components with more restrictive licenses than the Apache License and you’ll need to decide whether they are appropriate for your usage. The packages linked here contain proprietary parts of the NVidia CUDA SDK and GPL GCC Runtime Library components. Like all Apache Releases, the official Apache MXNet releases consist of source code only and are found at the Download page.
PREREQUISITES: CUDA should be installed first. Starting from version 1.8.0, CUDNN and NCCL should be installed as well.
Run the following command:
$ pip install mxnet-cu102$ pip install mxnet-cu102==1.8.0.post0$ pip install mxnet-cu102==1.7.0$ pip install mxnet-cu102==1.6.0.post0$ pip install mxnet-cu101==1.5.1$ pip install mxnet-cu101==1.4.1$ pip install mxnet-cu92==1.3.1$ pip install mxnet-cu92==1.2.1$ pip install mxnet-cu91==1.1.0$ pip install mxnet-cu90==1.0.0$ pip install mxnet-cu90==0.12.1$ pip install mxnet-cu80==0.11.0You can then validate your MXNet installation.
NOTES:
mxnet-cu101 means the package is built with CUDA/cuDNN and the CUDA version is 10.1.
All MKL pip packages are experimental prior to version 1.3.0.
Important: Make sure your installed CUDA (CUDNN/NCCL if applicable) version matches the CUDA version in the pip package.
Check your CUDA version with the following command:
nvcc --versionYou can either upgrade your CUDA install or install the MXNet package that supports your CUDA version.
WARNING: the following links and names of binary distributions are provided for your convenience but they point to packages that are not provided nor endorsed by the Apache Software Foundation. As such, they might contain software components with more restrictive licenses than the Apache License and you’ll need to decide whether they are appropriate for your usage. The packages linked here contain proprietary parts of the NVidia CUDA SDK and GPL GCC Runtime Library components. Like all Apache Releases, the official Apache MXNet releases consist of source code only and are found at the Download page.
Docker images with MXNet are available at DockerHub.
Please follow the NVidia Docker installation instructions to enable the usage of GPUs from the docker containers.
After you installed Docker on your machine, you can use them via:
$ docker pull mxnet/python:gpu # Use sudo if you skip Step 2You can list docker images to see if mxnet/python docker image pull was successful.
$ docker images # Use sudo if you skip Step 2

REPOSITORY TAG IMAGE ID CREATED SIZE
mxnet/python gpu 493b2683c269 3 weeks ago 4.77 GB
You can then validate the installation.
Please follow the build from source instructions linked above.
You will need to R v3.4.4+ and build MXNet from source. Please follow the instructions linked above.
Prebuilt binaries distributed via Maven have been removed as they redistributed Category-X binaries in violation of Apache Software Foundation (ASF) policies. If you would like to help re-do the binary releases in an ASF-compliant manner, please reach out via one of the developer communications channels. Until then, please follow the build from source instructions linked below.
Please refer to the MXNet-Clojure setup guide for a detailed set of instructions to help you with the setup process that is required to use the Clojure dependency.
Previously available binaries distributed via Maven have been removed as they redistributed Category-X binaries in violation of Apache Software Foundation (ASF) policies.
At this point in time, no third-party binary Java packages are available. Please follow the build from source instructions linked above.
Please follow the build from source instructions linked above.
Please follow the build from source instructions linked above.
To use the C++ package, build from source the USE_CPP_PACKAGE=1 option. Please
refer to the build from source instructions linked above.
WARNING: the following PyPI package names are provided for your convenience but they point to packages that are not provided nor endorsed by the Apache Software Foundation. As such, they might contain software components with more restrictive licenses than the Apache License and you’ll need to decide whether they are appropriate for your usage. The packages linked here contain GPL GCC Runtime Library components. Like all Apache Releases, the official Apache MXNet releases consist of source code only and are found at the Download page.
Run the following command:
pip install mxnetpip install mxnet==1.8.0.post0pip install mxnet-native==1.8.0.post0pip install mxnet==1.7.0.post2pip install mxnet-native==1.7.0pip install mxnet==1.6.0pip install mxnet-mkl==1.6.0pip install mxnet==1.5.1pip install mxnet-mkl==1.5.1pip install mxnet==1.4.1pip install mxnet-mkl==1.4.1pip install mxnet==1.3.1pip install mxnet-mkl==1.3.1pip install mxnet==1.2.1pip install mxnet-mkl==1.2.1pip install mxnet==1.1.0pip install mxnet==1.0.0pip install mxnet==0.12.1pip install mxnet==0.12.0pip install mxnet==0.11.0You can then validate your MXNet installation.
NOTES:
mxnet-cu101 means the package is built with CUDA/cuDNN and the CUDA version is 10.1.
All MKL pip packages are experimental prior to version 1.3.0.
WARNING: the following links and names of binary distributions are provided for your convenience but they point to packages that are not provided nor endorsed by the Apache Software Foundation. As such, they might contain software components with more restrictive licenses than the Apache License and you’ll need to decide whether they are appropriate for your usage. Like all Apache Releases, the official Apache MXNet releases consist of source code only and are found at the Download page.
Docker images with MXNet are available at DockerHub. After you installed Docker on your machine, you can use them via:
$ docker pull mxnet/pythonYou can list docker images to see if mxnet/python docker image pull was successful.
$ docker images # Use sudo if you skip Step 2

REPOSITORY TAG IMAGE ID CREATED SIZE
mxnet/python latest 00d026968b3c 3 weeks ago 1.41 GB
You can then validate the installation.
Please follow the build from source instructions linked above.
Please follow the build from source instructions linked above.
You will need to R v3.4.4+ and build MXNet from source. Please follow the instructions linked above.
Prebuilt binaries distributed via Maven have been removed as they redistributed Category-X binaries in violation of Apache Software Foundation (ASF) policies. If you would like to help re-do the binary releases in an ASF-compliant manner, please reach out via one of the developer communications channels. Until then, please follow the build from source instructions linked below.
Please refer to the MXNet-Clojure setup guide for a detailed set of instructions to help you with the setup process that is required to use the Clojure dependency.
Previously available binaries distributed via Maven have been removed as they redistributed Category-X binaries in violation of Apache Software Foundation (ASF) policies.
At this point in time, no third-party binary Java packages are available. Please follow the build from source instructions linked above.
Please follow the build from source instructions linked above.
Please follow the build from source instructions linked above.
To use the C++ package, build from source the USE_CPP_PACKAGE=1 option. Please
refer to the build from source instructions linked above.
WARNING: the following PyPI package names are provided for your convenience but they point to packages that are not provided nor endorsed by the Apache Software Foundation. As such, they might contain software components with more restrictive licenses than the Apache License and you’ll need to decide whether they are appropriate for your usage. The packages linked here contain GPL GCC Runtime Library components. Like all Apache Releases, the official Apache MXNet releases consist of source code only and are found at the Download page.
Run the following command:
pip install mxnetpip install mxnet==1.8.0.post0pip install mxnet-native==1.8.0.post0pip install mxnet==1.7.0.post2pip install mxnet-native==1.7.0pip install mxnet==1.6.0pip install mxnet-mkl==1.6.0pip install mxnet==1.5.1pip install mxnet-mkl==1.5.1pip install mxnet==1.4.1pip install mxnet-mkl==1.4.1pip install mxnet==1.3.1pip install mxnet-mkl==1.3.1pip install mxnet==1.2.1pip install mxnet-mkl==1.2.1pip install mxnet==1.1.0pip install mxnet==1.0.0pip install mxnet==0.12.1pip install mxnet==0.12.0pip install mxnet==0.11.0You can then validate your MXNet installation.
NOTES:
mxnet-cu101 means the package is built with CUDA/cuDNN and the CUDA version is 10.1.
All MKL pip packages are experimental prior to version 1.3.0.
Please follow the build from source instructions linked above.
WARNING: the following PyPI package names are provided for your convenience but they point to packages that are not provided nor endorsed by the Apache Software Foundation. As such, they might contain software components with more restrictive licenses than the Apache License and you’ll need to decide whether they are appropriate for your usage. The packages linked here contain proprietary parts of the NVidia CUDA SDK and GPL GCC Runtime Library components. Like all Apache Releases, the official Apache MXNet releases consist of source code only and are found at the Download page.
PREREQUISITES: CUDA should be installed first. Starting from version 1.8.0, CUDNN and NCCL should be installed as well.
Run the following command:
$ pip install mxnet-cu102$ pip install mxnet-cu102==1.8.0.post0$ pip install mxnet-cu102==1.7.0$ pip install mxnet-cu102==1.6.0.post0$ pip install mxnet-cu101==1.5.1$ pip install mxnet-cu101==1.4.1$ pip install mxnet-cu92==1.3.1$ pip install mxnet-cu92==1.2.1$ pip install mxnet-cu91==1.1.0$ pip install mxnet-cu90==1.0.0$ pip install mxnet-cu90==0.12.1$ pip install mxnet-cu80==0.11.0You can then validate your MXNet installation.
NOTES:
mxnet-cu101 means the package is built with CUDA/cuDNN and the CUDA version is 10.1.
All MKL pip packages are experimental prior to version 1.3.0.
Important: Make sure your installed CUDA (CUDNN/NCCL if applicable) version matches the CUDA version in the pip package.
Check your CUDA version with the following command:
nvcc --versionYou can either upgrade your CUDA install or install the MXNet package that supports your CUDA version.
Please follow the build from source instructions linked above.
You will need to R v3.4.4+ and build MXNet from source. Please follow the instructions linked above.
Prebuilt binaries distributed via Maven have been removed as they redistributed Category-X binaries in violation of Apache Software Foundation (ASF) policies. If you would like to help re-do the binary releases in an ASF-compliant manner, please reach out via one of the developer communications channels. Until then, please follow the build from source instructions linked below.
Please refer to the MXNet-Clojure setup guide for a detailed set of instructions to help you with the setup process that is required to use the Clojure dependency.
Previously available binaries distributed via Maven have been removed as they redistributed Category-X binaries in violation of Apache Software Foundation (ASF) policies.
At this point in time, no third-party binary Java packages are available. Please follow the build from source instructions linked above.
Please follow the build from source instructions linked above.
Please follow the build from source instructions linked above.
To use the C++ package, build from source the USE_CPP_PACKAGE=1 option. Please
refer to the build from source instructions linked above.
MXNet is available on several cloud providers with GPU support. You can also find GPU/CPU-hybrid support for use cases like scalable inference, or even fractional GPU support with AWS Elastic Inference.
WARNING: the following cloud provider packages are provided for your convenience but they point to packages that are not provided nor endorsed by the Apache Software Foundation. As such, they might contain software components with more restrictive licenses than the Apache License and you’ll need to decide whether they are appropriate for your usage. Like all Apache Releases, the official Apache MXNet releases consist of source code only and are found at the Download page.
- Alibaba
- NVIDIA VM
- Amazon Web Services
- Amazon SageMaker - Managed training and deployment of MXNet models
- AWS Deep Learning AMI - Preinstalled Conda environments for Python 2 or 3 with MXNet, CUDA, cuDNN, oneDNN, and AWS Elastic Inference
- Dynamic Training on AWS - experimental manual EC2 setup or semi-automated CloudFormation setup
- NVIDIA VM
- Google Cloud Platform
- NVIDIA VM
- Microsoft Azure
- NVIDIA VM
- Oracle Cloud
- NVIDIA VM
All NVIDIA VMs use the NVIDIA MXNet Docker container. Follow the container usage instructions found in NVIDIA’s container repository.
MXNet should work on any cloud provider’s CPU-only instances. Follow the Python pip install instructions, Docker instructions, or try the following preinstalled option.
WARNING: the following cloud provider packages are provided for your convenience but they point to packages that are not provided nor endorsed by the Apache Software Foundation. As such, they might contain software components with more restrictive licenses than the Apache License and you’ll need to decide whether they are appropriate for your usage. Like all Apache Releases, the official Apache MXNet releases consist of source code only and are found at the Download page.
- Amazon Web Services
- AWS Deep Learning AMI - Preinstalled Conda environments for Python 2 or 3 with MXNet and oneDNN.
MXNet supports running on ARM devices, such as the Raspberry PI.
These instructions will walk through how to build MXNet for the Raspberry Pi and install the Python bindings for the library.
You can do a cross compilation build on your local machine (faster) or a native build on-device (slower, but more foolproof).
The complete MXNet library and its requirements can take almost 200MB of RAM, and loading large models with the library can take over 1GB of RAM. Because of this, we recommend running MXNet on the Raspberry Pi 3 or an equivalent device that has more than 1 GB of RAM and a Secure Digital (SD) card that has at least 4 GB of free memory.
Native build on the Raspberry Pi
To build MXNet directly on the Raspberry Pi device, you can mainly follow the
standard Ubuntu setup
instructions. However, skip the step of copying the config/linux.cmake to
config.cmake and instead run the cmake in the “Build MXNet core shared
library” step as follows:
rm -rf build
mkdir -p build && cd build
cmake \
  -DUSE_SSE=OFF \
  -DUSE_CUDA=OFF \
  -DUSE_BLAS=Open \
  -DUSE_OPENCV=ON \
  -DUSE_OPENMP=ON \
  -DUSE_SIGNAL_HANDLER=ON \
  -DCMAKE_BUILD_TYPE=Release \
  -GNinja ..
ninja -j$(nproc)
Some compilation units require memory close to 1GB, so it’s recommended that you
enable swap as explained below and be cautious about increasing the number of
jobs when building (-j). Executing these commands start the build process, which
can take up to a couple hours, and creates a file called libmxnet.so in the
build directory.
If you are getting build errors in which the compiler is being killed, it is likely that the compiler is running out of memory (especially if you are on Raspberry Pi 1, 2 or Zero, which have less than 1GB of RAM), this can often be rectified by increasing the swapfile size on the Pi by editing the file /etc/dphys-swapfile and changing the line CONF_SWAPSIZE=100 to CONF_SWAPSIZE=1024, then running:
sudo /etc/init.d/dphys-swapfile stop
sudo /etc/init.d/dphys-swapfile start
free -m # to verify the swapfile size has been increased
Cross-compiling on your local machine
Obtaining the toolchain
You first need to setup the cross-compilation toolchain on your local machine.
On Debian based systems, you can install crossbuild-essential-armel to obtain
a cross-toolchain for the ARMv4T, 5T, and 6, crossbuild-essential-armhf ARMv7
architecture and crossbuild-essential-arm64 for ARMv8 (also called aarch64).
See for example
Wikipedia to
determine the architecture of your Raspberry PI devices. If none of the Debian
toolchains works for you, you may like to refer to
toolchains.bootlin.com for a large number of
ready-to-use cross-compilation toolchains.
Cross-compiling MXNet dependencies
Before compiling MXNet, you need to cross-compile MXNet’s dependencies. At the
very minimum, you’ll need OpenBLAS. You can cross-compile it as follows,
replacing the CC=aarch64-linux-gnu-gcc and PREFIX=/usr/aarch64-linux-gnu
based on your architecture:
git clone --recursive https://github.com/xianyi/OpenBLAS.git
cd OpenBLAS
make NOFORTRAN=1 NO_SHARED=1 CC=aarch64-linux-gnu-gcc
make PREFIX=/usr/local/aarch64-linux-gnu NO_SHARED=1 install
If you would like to compile MXNet with OpenCV support, enabling various image transformation related features, you also need to cross-compile OpenCV.
Cross-compiling MXNet
Before you cross-compile MXNet, create a CMake toolchain file specifying all settings for your compilation. For example, aarch64-linux-gnu-toolchain.cmake:
``` set(CMAKE_SYSTEM_NAME Linux) set(CMAKE_SYSTEM_PROCESSOR “aarch64”) set(CMAKE_C_COMPILER aarch64-linux-gnu-gcc) set(CMAKE_CXX_COMPILER aarch64-linux-gnu-g++) set(CMAKE_CUDA_HOST_COMPILER aarch64-linux-gnu-gcc) set(CMAKE_FIND_ROOT_PATH “/usr/aarch64-linux-gnu;/usr/local/aarch64-linux-gnu”)
set(CMAKE_FIND_ROOT_PATH_MODE_PROGRAM NEVER) set(CMAKE_FIND_ROOT_PATH_MODE_LIBRARY ONLY) set(CMAKE_FIND_ROOT_PATH_MODE_INCLUDE ONLY) set(CMAKE_FIND_ROOT_PATH_MODE_PACKAGE ONLY) ```
CMAKE_FIND_ROOT_PATH should be a list of directories containing the
cross-compilation toolchain and MXNet’s cross-compiled dependencies. If you use
a toolchain from the bootlin site linked above, you can find the respective
CMake toolchain file at share/buildroot/toolchainfile.cmake.
You can then cross-compile MXNet via
mkdir build; cd build
cmake -DCMAKE_TOOLCHAIN_FILE=${CMAKE_TOOLCHAIN_FILE} \
  -DUSE_CUDA=OFF \
  -DSUPPORT_F16C=OFF \
  -DUSE_BLAS=Open \
  -DUSE_OPENCV=OFF \
  -DUSE_OPENMP=ON \
  -DUSE_LAPACK=OFF \
  -DUSE_SIGNAL_HANDLER=ON \
  -DCMAKE_BUILD_TYPE=Release \
  -G Ninja ..
ninja
cd ..
We would like to simplify this setup by integrating the Conan C++ dependency manager. Please send an email to the MXNet development mailinglist or open an issue on Github if you would like to help.
Building the Python wheel
To build the wheel, you can follow the following process
``` export MXNET_LIBRARY_PATH=$(pwd)/build/libmxnet.so
cd python python3 setup.py bdist_wheel
Fix pathing issues in the wheel. We need to move libmxnet.so from the data folder to the
# mxnet folder, then repackage the wheel.
WHEEL=readlink -f dist/*.whl
TMPDIR=mktemp -d
unzip -d ${TMPDIR} ${WHEEL}
rm ${WHEEL}
cd ${TMPDIR}
mv *.data/data/mxnet/libmxnet.so mxnet
zip -r ${WHEEL} .
cp ${WHEEL} ..
rm -rf ${TMPDIR}
```
We intend to fix the setup.py to avoid the repackaging step. If you would like
to help, please send an email to the MXNet development mailinglist or open an
issue on Github.
Final remarks
You are now ready to run MXNet on your Raspberry Pi device. You can get started by following the tutorial on Real-time Object Detection with MXNet On The Raspberry Pi.
Note - Because the complete MXNet library takes up a significant amount of the Raspberry Pi’s limited RAM, when loading training data or large models into memory, you might have to turn off the GUI and terminate running processes to free RAM.
NVIDIA Jetson Devices
To install MXNet on a Jetson TX or Nano, please refer to the Jetson installation guide.